Saturday, April 15, 2023

What is an action filter in ASP.NET Core and how does it work?

An action filter is a type of middleware in ASP.NET Core that is used to execute code before or after an action method is executed. Action filters can be used to modify the request or response, perform authentication or authorization checks, add or remove headers or cookies, or log information about the request or response.

Action filters are applied to action methods in a controller using attributes. For example, the [Authorize] attribute is an action filter that is used to ensure that the user is authenticated before executing the action method. Other common action filters in ASP.NET Core include [AllowAnonymous], [ValidateAntiForgeryToken], [RequireHttps], and [ResponseCache].

Here's an example of how to create a custom action filter in ASP.NET Core:
 

public class LogActionFilter : IActionFilter

{

private readonly ILogger _logger;


public LogActionFilter(ILogger<LogActionFilter> logger)

{

     _logger = logger;

}


public void OnActionExecuting(ActionExecutingContext context)

{

     _logger.LogInformation("Action method {ActionName} is executing.", context.ActionDescriptor.DisplayName);

}


public void OnActionExecuted(ActionExecutedContext context)

{

     _logger.LogInformation("Action method {ActionName} has completed with status code {StatusCode}.",

                             context.ActionDescriptor.DisplayName, context.HttpContext.Response.StatusCode);

}

}


In this example, the LogActionFilter class implements the IActionFilter interface, which defines two methods: OnActionExecuting and OnActionExecuted. These methods are called by the ASP.NET Core framework before and after the action method is executed, respectively.

In the OnActionExecuting method, the action filter logs a message indicating that the action method is executing, along with its display name. In the OnActionExecuted method, the action filter logs a message indicating that the action method has completed, along with its display name and the HTTP status code of the response.

To apply this action filter to an action method in a controller, you can add the [ServiceFilter] attribute to the method and specify the type of the action filter: 


[ServiceFilter(typeof(LogActionFilter))]

public IActionResult Index()

{

return View();

}


This will cause the LogActionFilter to be executed before and after the Index action method is executed.


What is middleware in ASP.NET Core and how does it work?

Middleware in ASP.NET Core is software components that are placed in the request processing pipeline to handle requests and responses in a modular and composable way. Each middleware component in the pipeline performs a specific task, such as authentication, routing, logging, or caching, and can be added or removed as needed to create custom request processing pipelines.

The middleware pipeline in ASP.NET Core is composed of one or more middleware components that are executed sequentially in the order they are added. Each middleware component can perform some operation on the incoming request or outgoing response, such as modifying headers, redirecting requests, or returning a response directly.

Here's an example of how middleware works in ASP.NET Core:

public void Configure(IApplicationBuilder app, IWebHostEnvironment env)

{

if (env.IsDevelopment())

{

     app.UseDeveloperExceptionPage();

}

else

{

     app.UseExceptionHandler("/Error");

     app.UseHsts();

}


app.UseHttpsRedirection();

app.UseStaticFiles();

app.UseRouting();

app.UseAuthorization();

app.UseEndpoints(endpoints =>

{

     endpoints.MapControllers();

});

}

In this example, the Configure method in the Startup class sets up the middleware pipeline for an

ASP.NET Core application. The first middleware component is the DeveloperExceptionPage middleware, which displays detailed error information in the response when running in development mode. This middleware is only added to the pipeline if the application is running in development mode.

The next middleware component is the ExceptionHandler middleware, which handles exceptions that occur during request processing and returns an error response. This middleware is added to the pipeline for all environments.

The HttpsRedirection middleware and StaticFiles middleware handle HTTP redirection and static file serving, respectively. These middleware components are added to the pipeline for all requests.

The Routing middleware and Authorization middleware handle routing and authentication/authorization, respectively. These middleware components are added to the pipeline for all requests.

Finally, the Endpoints middleware maps the incoming requests to the appropriate controller action method based on the route template. This middleware is added to the pipeline for all requests.

By composing middleware components in this way, you can build custom request processing pipelines that handle requests and responses in a flexible and modular way.


What is the difference between transient, scoped, and singleton services in .NET Core?

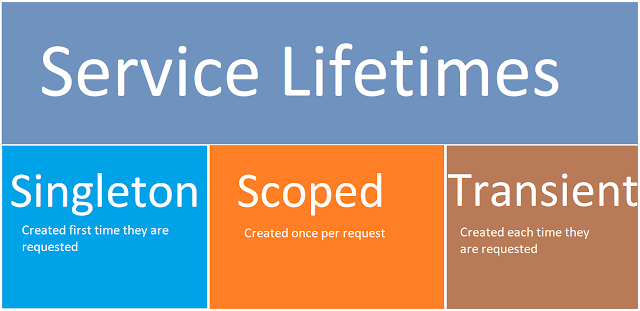
DI Service Lifetimes

 
In .NET Core, services registered with the dependency injection container can be registered as either transient, scoped, or singleton. These lifetimes control how many instances of a service are created and how long they are held in memory.

Transient services are created each time they are requested. Every time you request an instance of a transient service, a new instance is created. Transient services are good for lightweight, stateless services that can be easily created and destroyed. For example, a Random number generator might be a good candidate for a transient service.


Scoped services are created once per request (i.e., per HTTP request in the case of an ASP.NET Core application). Once a scoped service has been created, it is used for the duration of the request, and then destroyed. Scoped services are useful for stateful services that need to be reused across multiple objects or components during the processing of a single request. For example, a database context might be a good candidate for a scoped service.


Singleton services are created once and reused for the lifetime of the application. A single instance of the service is created when the application starts up and then reused across all requests. Singleton services are good for services that are expensive to create or that hold application-level state. For example, a configuration service that reads configuration settings from a file might be a good candidate for a singleton service.


It's important to choose the appropriate lifetime for your services based on their usage and resource requirements. Choosing the wrong lifetime can lead to performance problems, memory leaks, or unexpected behavior.

What is dependency injection and how do you use it in .NET Core?

Dependency injection (DI) is a design pattern in which an object or component's dependencies (i.e., the objects it requires to function properly) are injected or provided from an external source rather than being created internally. In .NET Core, dependency injection is built into the framework and can be used to manage dependencies between objects and components.


Here's an example of how to use DI in a .NET Core application:


1. Define the dependencies: Start by defining the dependencies that your object or component requires. You can do this using constructor injection, property injection, or method injection. For example:

public class MyService
{
    private readonly ILogger<MyService> _logger;
    private readonly IEmailService _emailService;

    public MyService(ILogger<MyService> logger, IEmailService emailService)
    {
        _logger = logger;
        _emailService = emailService;
    }

    // ...
}


This example defines a MyService class that depends on a logger and an email service. The dependencies are defined using constructor injection.


2. Register the dependencies: Next, you need to register the dependencies with the .NET Core dependency injection container. You can do this in the ConfigureServices method of your Startup class. For example:

public void ConfigureServices(IServiceCollection services)
{
    services.AddLogging();
    services.AddSingleton<IEmailService, EmailService>();
    services.AddTransient<MyService>();
}


This example registers the logger, email service, and MyService class with the dependency injection container. The AddLogging method adds the built-in logging services to the container, while the AddSingleton and AddTransient methods register the email service and MyService class as singleton and transient services, respectively.
 

3. Use the dependencies: Finally, you can use the dependencies in your application code by injecting them into your objects or components. For example:

public class HomeController : Controller
{
    private readonly MyService _myService;

    public HomeController(MyService myService)
    {
        _myService = myService;
    }

    public IActionResult Index()
    {
        _myService.DoSomething();
        return View();
    }
}


This example injects the MyService class into a controller class and uses it to perform some action in the Index method.


Overall, dependency injection is a powerful pattern that can help you manage dependencies between objects and components in your .NET Core applications, making your code more modular, testable, and maintainable.

How do you configure logging in a .NET Core application?

In .NET Core, logging can be configured using the built-in logging infrastructure, which provides a flexible and extensible framework for capturing and storing application logs. Here are the basic steps to configure logging in a .NET Core application:

  1. Add the logging package: To use the built-in logging infrastructure, you first need to add the Microsoft.Extensions.Logging NuGet package to your project. You can do this using the NuGet Package Manager in Visual Studio or by running the following command in a command prompt:
  2. dotnet add package Microsoft.Extensions.Logging
  3. Create a logger factory: The logger factory is responsible for creating instances of loggers, which can be used to write log messages to various logging providers. You can create a logger factory using the ILoggerFactory interface, which is part of the Microsoft.Extensions.Logging namespace.
  4. Add logging providers: Logging providers are responsible for capturing and storing log messages. .NET Core provides several built-in logging providers, including console, debug, and file providers. You can add logging providers to the logger factory using the AddConsole, AddDebug, or AddFile extension methods.
  5. Configure logging options: You can configure logging options using the appsettings.json or appsettings.{Environment}.json configuration files. These files can be used to set logging levels, filter log messages based on various criteria, and configure logging providers.
  6. Use the logger: Once logging is configured, you can use the ILogger<T> interface to write log messages to the configured logging providers. You can create an instance of the logger interface by injecting it into your application's classes or by creating it manually using the logger factory.


Here's an example of how to configure logging in a .NET Core application:


// Add the logging package to the project

dotnet add package Microsoft.Extensions.Logging


// Create a logger factory

ILoggerFactory loggerFactory = LoggerFactory.Create(builder =>

{

builder.AddConsole();

builder.AddDebug();

});


// Use the logger in your application code

ILogger<MyClass> logger = loggerFactory.CreateLogger<MyClass>();

logger.LogInformation("Hello, world!");


This example creates a logger factory that adds console and debug logging providers and creates a logger instance that can be used to write log messages. The Log Information method is used to write an information-level log message to the configured logging providers.


What is a .NET Core module?

In .NET Core, a module is a self-contained unit of functionality that can be added to an application at runtime. A module is typically implemented as a dynamic link library (DLL) that contains one or more classes and can be loaded and executed by the .NET Core runtime.


Modules provide a way to extend the functionality of an application without having to modify its source code. They can be used to add new features, implement plugins, or customize the behavior of an application based on user preferences or other runtime conditions.


Modules can be loaded dynamically at runtime using the Assembly.Load method or other reflection APIs provided by .NET Core. Once loaded, a module's classes and methods can be invoked just like any other .NET Core code.


.NET Core supports several mechanisms for creating and distributing modules, including NuGet packages, class libraries, and runtime-specific extensions. Modules can be written in any .NET Core-compatible language, including C#, VB.NET, and F#.


Overall, modules provide a flexible and powerful way to extend and customize .NET Core applications, making them more adaptable and versatile for a variety of use cases.

How do you run a .NET Core application?

 To run a .NET Core application, follow these steps:


  1. Open a command prompt or terminal window.
  2. Navigate to the directory where the application is located using the cd command.
  3. Use the dotnet run command to run the application. For example, if you have a console application named MyConsoleApp, you can run it with the following command:  dotnet run --project MyConsoleApp.csproj
    This command builds and runs the MyConsoleApp project.
  4. If the application is a web application, it will typically start a web server and listen for incoming requests. You can then open a web browser and navigate to the appropriate URL to access the application.
  5. If the application is a console application, it will typically run and perform the specified tasks.


In some cases, you may need to provide additional command-line arguments or environment variables to the dotnet run command. You can do this by appending the arguments to the command. For example:


dotnet run --project MyConsoleApp.csproj --arg1 value1 --arg2 value2


This command passes two arguments (arg1 and arg2) with values (value1 and value2) to the MyConsoleApp project.

Note that you need to have the .NET Core runtime installed on your system to run .NET Core applications. You can download the .NET Core runtime from the official .NET website.

What are the different types of .NET Core applications?

.NET Core supports a variety of application types, each tailored to specific needs and use cases. Here are some of the most common types of .NET Core applications:

  1. Console applications: These are command-line applications that can be used to perform a variety of tasks, such as data processing, file management, and network communications.
  2. Web applications: These are applications that run in a web server and respond to HTTP requests. .NET Core supports a variety of web application types, including MVC, Razor Pages, Web API, and Blazor.
  3. Windows desktop applications: These are traditional Windows desktop applications that run on Windows operating systems. .NET Core supports two types of desktop applications: Windows Forms and WPF.
  4. Cross-platform desktop applications: These are desktop applications that can run on multiple operating systems, including Windows, Linux, and macOS. .NET Core supports several cross-platform desktop application frameworks, including Avalonia, Uno, and Electron.NET.
  5. Class libraries: These are reusable components that can be shared across multiple applications. Class libraries contain code that can be compiled into a DLL, which can be referenced by other projects.
  6. Unit test projects: These are projects that contain automated tests for testing the functionality of other projects. .NET Core provides several testing frameworks, including MSTest, NUnit, and xUnit.
  7. Azure Functions: These are serverless functions that can be triggered by events such as HTTP requests, timer events, and message queues. Azure Functions can be used to build scalable, event-driven applications.
  8. Docker containers: These are lightweight, portable containers that can be used to package and deploy .NET Core applications. .NET Core provides support for creating and running Docker containers.

These are just some of the types of applications that can be built using .NET Core. Depending on your needs, you can choose the appropriate application type and framework to build your application.

How do you create a new .NET Core project using the command line?

To create a new .NET Core project using the command line, follow these steps:

  1. Open a command prompt or terminal window.

  2. Navigate to the directory where you want to create the project.

  3. Type the following command to create a new .NET Core console application:

dotnet new console -o <project-name>


Replace <project-name> with the name you want to give to your project. This command creates a new console application project with the specified name.
  1. Navigate into the newly created project directory using the cd command:

cd <project-name>


  1. You can now build and run your application using the following commands:

dotnet build

dotnet run


The dotnet build command builds the project, while the dotnet run command runs the project.


You can also use other project templates provided by .NET Core, such as web applications, class libraries, and unit test projects, by using the appropriate dotnet new command with the -o option to specify the project name.

What is .NET Core and how does it differ from the .NET Framework?

.NET Core is a cross-platform, open-source framework developed by Microsoft that is used to develop modern applications for Windows, Linux, and macOS operating systems. It is a modular and lightweight platform that allows developers to build high-performance, scalable, and reliable applications for a variety of devices and platforms.


On the other hand, the .NET Framework is a Windows-only platform that is used to develop applications for the Windows operating system. It is a comprehensive and robust platform that has been around for more than two decades and is widely used by developers to build desktop, web, and server applications.


The main difference between .NET Core and the .NET Framework is that .NET Core is cross-platform, while the .NET Framework is limited to Windows. .NET Core is also more lightweight and modular compared to the .NET Framework, which makes it easier for developers to create and deploy applications.


Another difference between the two is that .NET Core has a smaller footprint and can be easily deployed with the application, while the .NET Framework requires installation on the target system. This makes it easier to deploy applications built with .NET Core on a wide range of devices and platforms.


In summary, while the .NET Framework is a comprehensive and robust platform that is limited to Windows, .NET Core is a modular, lightweight, and cross-platform framework that allows developers to build applications for a variety of platforms and devices.